

Unlock the power of conversational AI in your next project. Have you ever wondered, “How can you integrate GPT-4 and GPT-3.5 Turbo APIs into your website or application?”
Integrating GPT-4 and GPT-3.5 Turbo APIs into your website or application is a straightforward process using Javascript, public libraries, and OpenAI.
Table of Contents
- Setting Up Your OpenAI Account
- NodeJS and VSCode Setup
- Setting Up the Project Environment
- OpenAI Initialization
- Querying GPT-4 for Chat Completion
- Setting Up the Express REST Server
- Making the Chat Interactive
- Creating the Frontend
- Frontend JavaScript Setup
- Fetch Request to OpenAI Backend
- Adding Message History in GPT
- Resources
Whether you’re a seasoned developer or a complete beginner, this article has something for everyone. While this article is a detailed summary of a video tutorial by Adrian Twarog, the insights and steps are universally applicable.
Stay tuned as we delve into the nitty-gritty of setting up your OpenAI account, initializing your project, and making your chat application come to life.
Setting Up Your OpenAI Account
So, you’re ready to unlock the power of conversational AI. The first step in this journey is setting up your OpenAI account. This is the gateway to accessing the GPT-4 and GPT-3.5 Turbo APIs, which will be the backbone of your chat application.
OpenAI Dashboard and Account Setup
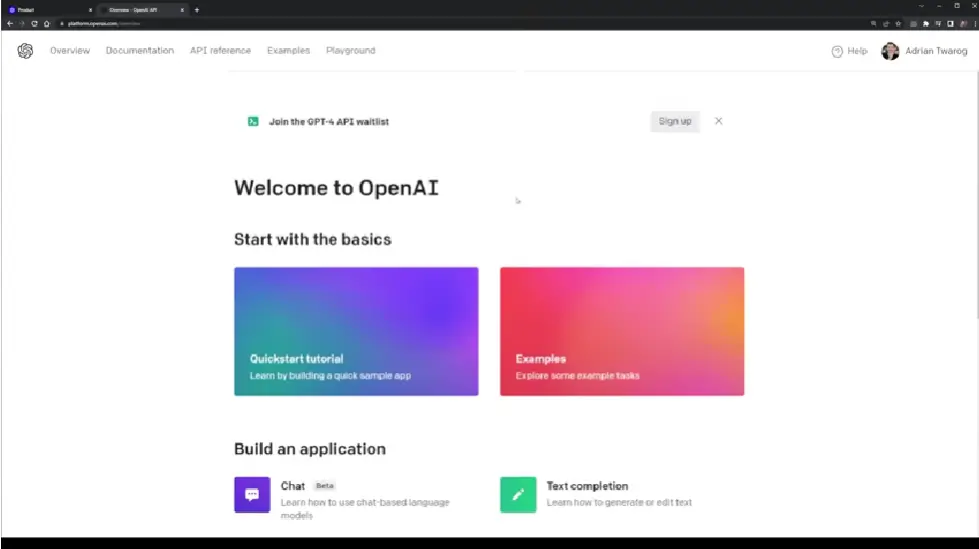
Navigating to the OpenAI Dashboard
Start by heading to OpenAI’s website. You can either search for OpenAI on Google or directly enter the URL into your browser. Once you’re on the homepage, look for the “Products and Overview” section in the top menu. From there, click on the “Get Started” button.
Creating Your Account
You’ll be presented with a few options for account creation. You can either sign in with an existing account, use your Google account, or create a brand new account. Choose the option that best suits you.
Exploring the Dashboard
Once your account is set up, you’ll be taken to the OpenAI dashboard. This is your command center for all things related to OpenAI and its APIs. Here’s a quick rundown of what you can do:
- Documentation: A comprehensive guide to understanding how OpenAI and its models work.
- API Reference: This will be your go-to resource for setting up the API in your project.
- Playground: A space where you can interact with various OpenAI models, including GPT-4 and GPT-3.5 Turbo, to test out their capabilities.
API Keys and Organization ID
Before you can start building, you’ll need two crucial pieces of information: your API key and your Organization ID. To find these, navigate to the “My Account” section and click on “View API keys.” Here, you can create a new API key, which you’ll use to authenticate your application. Your Organization ID can be found under the “Settings” tab.
With your OpenAI account set up and your API key and Organization ID in hand, you’re ready to move on to the next step: setting up your development environment. Stay tuned!
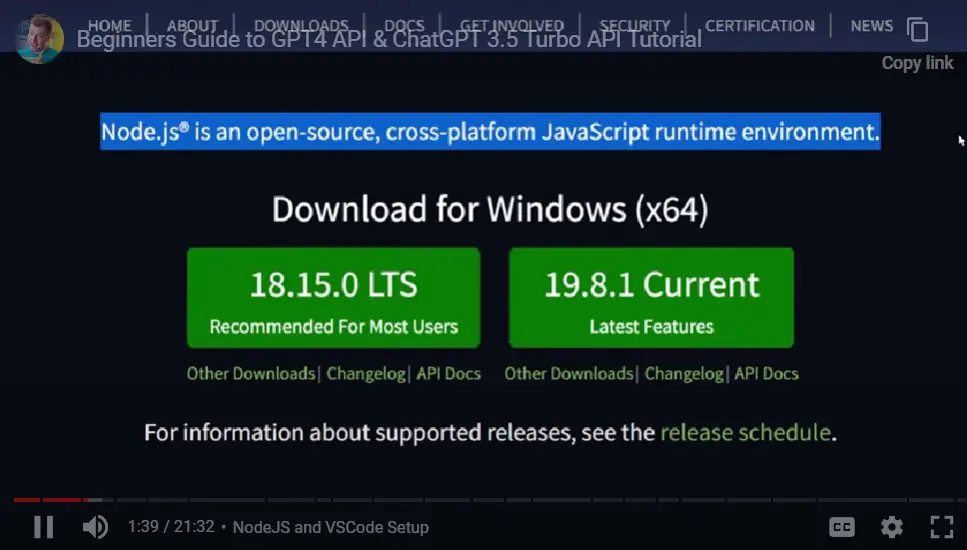
NodeJS and VSCode Setup
Before diving into the world of ChatGPT APIs, you’ll need to set up your development environment. This section will guide you through the installation of two essential software: NodeJS and Visual Studio Code (VSCode). These tools will serve as the backbone for your ChatGPT project.
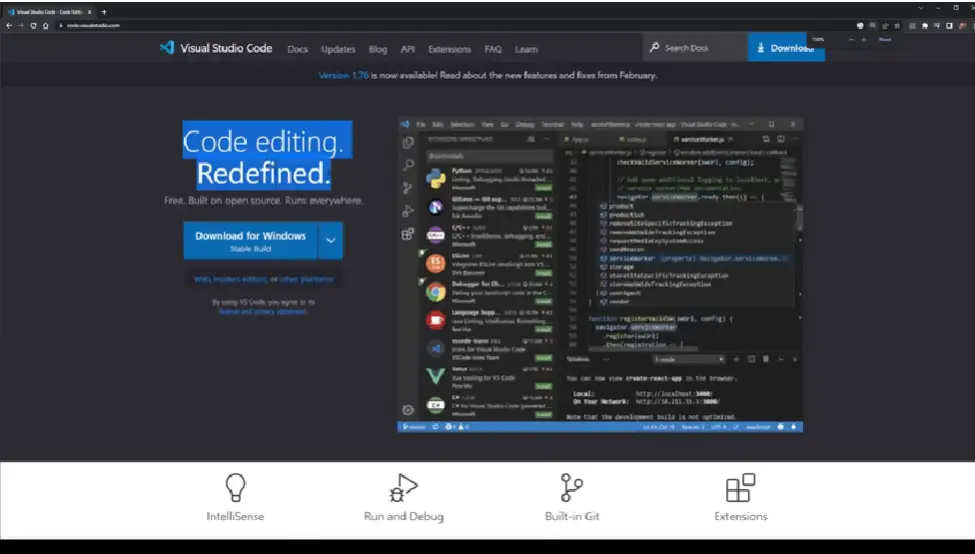
Why NodeJS and VSCode?
NodeJS is a JavaScript runtime that allows you to build server-side applications. It’s a crucial component for running your ChatGPT API calls. On the other hand, VSCode is a versatile code editor that offers a range of features, including syntax highlighting and a rich set of extensions, making your coding experience smoother.
Downloading NodeJS
To install NodeJS, head over to the official NodeJS website and download the version that’s appropriate for your operating system. The site offers both LTS (Long Term Support) and Current versions. For most users, the LTS version is the safest bet.
NodeJS Installation Prompt
Installing NodeJS
Once the download is complete, open the installer and follow the prompts. The installation is straightforward—just keep clicking “Next” until you reach the “Finish” button. Congratulations, you’ve successfully installed NodeJS!
Downloading VSCode
For VSCode, visit the official VSCode website and download the installer for your operating system. VSCode is available for Windows, macOS, and Linux.
VSCode Installation Prompt
Installing VSCode
Similar to NodeJS, the VSCode installation is a breeze. Open the installer and follow the on-screen instructions. Once installed, launch VSCode, and you’ll be greeted with a welcome screen. From here, you can open a new file, install extensions, and much more.
Setting Up the Project Environment
Now that you’ve set up your OpenAI account and installed the necessary software, it’s time to dive into the heart of your project. In this section, we’ll walk you through initializing your project using npm and explain the significance of the package.json file.
Terminal Showing Npm Initialization and Package.json File

Initializing Your Project with npm
To kickstart your project, you’ll need to initialize it using npm (Node Package Manager). Open your terminal and navigate to your project directory. Run the following command:
npm initThis command will prompt you to enter some basic information about your project, such as its name, version, and description. You can either fill these in or simply press enter to accept the default values.
Understanding package.json
The npm init command generates a package.json file in your project directory. This file serves as the manifest for your project, containing metadata and dependencies. It’s essentially the blueprint that npm uses to manage your project’s packages.
{
  "name": "your_project_name",
  "version": "1.0.0",
  "description": "",
  "main": "index.js",
  "scripts": {
    "test": "echo \"Error: no test specified\" && exit 1"
  },
  "author": "",
  "license": "ISC"
}
The package.json file is crucial for the functionality and management of your Node.js application. It’s also essential for deploying your app and installing Node modules.
Next Steps
With your project now initialized and your package.json file set up, you’re ready to move on to initializing OpenAI in your project. Stay tuned for the next section where we’ll dive into that.
OpenAI Initialization
Unlock the power of OpenAI’s GPT models in your application by initializing them correctly.
Why Initialization is Crucial
Before diving into the code, it’s essential to understand why proper initialization is crucial. Initialization sets the stage for all the interactions you’ll have with OpenAI’s APIs. It’s like the handshake in a conversation, establishing the rules and parameters for what follows.
Code Snippets for Initialization
Let’s get our hands dirty with some code. Below are the snippets you’ll need to initialize OpenAI in your NodeJS project.
// Import the OpenAI library
const { OpenAIAPI } = require('openai');

// Initialize OpenAI with your API key
const openai = new OpenAIAPI({
      organization: "organization-key"
      apikey: "your-api-key-here"
});
OpenAI API keys and Organization ID Settings
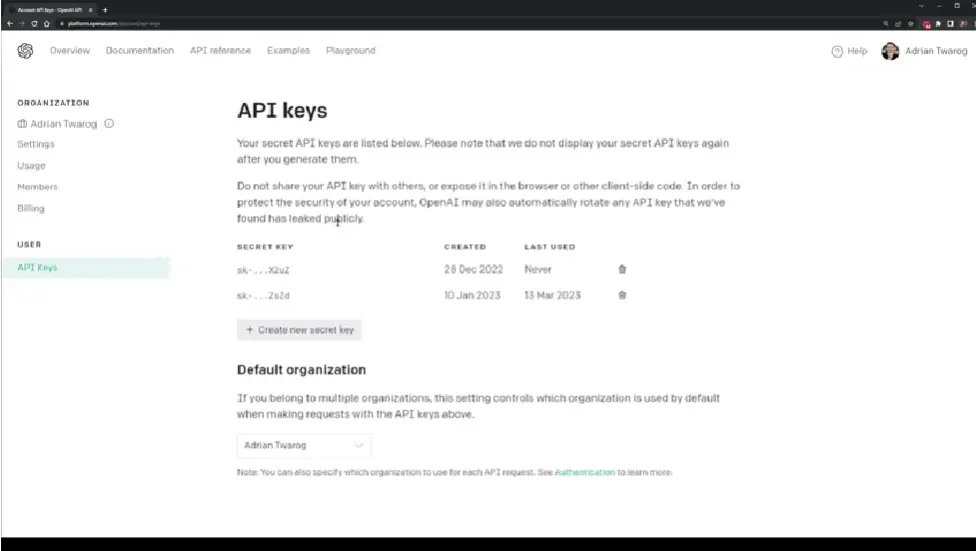
Setting Up API Keys and Organization ID
API keys are like the passport for your project to interact with OpenAI’s services. You’ll need to set this up in your OpenAI dashboard. The Organization ID is another crucial identifier, especially if you’re working within a team or larger organization.
Here’s how to find these:
- Log in to your OpenAI Dashboard.
- Navigate to the API section.
- Generate a new API key or use an existing one.
- Find your Organization ID under the settings tab.
Integrating API Keys into Your Code
Once you have your API key and Organization ID, you can integrate them into your code. Here’s how:
// Initialize OpenAI with your API key and Organization ID
const openai = new OpenAIAPI({
  apikey: "your-api-key-here",
  organization: "your-organization-id-here"
});
And there you have it! You’ve successfully initialized OpenAI in your project, paving the way for some incredible AI-powered features.
Querying GPT-4 for Chat Completion
Now that you’ve set up your OpenAI account and initialized your project, it’s time to dive into the heart of the matter: querying GPT-4 for chat completion. This section will guide you through the process of setting up chat models and messages, allowing you to interact with GPT-4 in a meaningful way.
Code Snippet for Querying Chat Completion
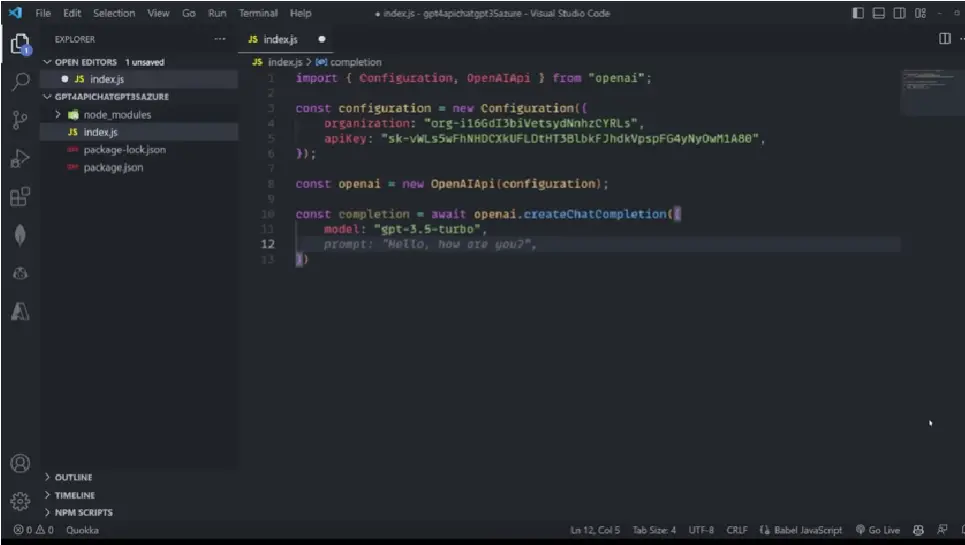
Introduction to Querying OpenAI
Querying OpenAI’s GPT-4 is a straightforward process, thanks to the robust API provided. You’ll be using the create_chat_completion method, which is specifically designed for chat-based interactions.
Code Snippets for Setting Up Chat Models
const completion = await openAI.create_chat_completion({ model: 'gpt-4.0-turbo', messages: [ { role: 'user', content: 'Hello, world!' } ] });
Code Snippets for Setting Up Messages
const messages = [ { role: 'user', content: 'Tell me a joke.' }, { role: 'assistant', content: 'Why did the chicken cross the road?' } ];
Once you’ve set up your chat models and messages, you can proceed to make the API call. The response will contain the chat completion, which you can then use in your application.
Next Steps
With the chat models and messages set up, you’re now ready to move on to setting up an Express REST server, which will be covered in the next section. Stay tuned!
Setting Up the Express REST Server
Now that you’ve successfully queried GPT-4 for chat completion, the next logical step is to make this functionality accessible via a web server. This is where Express.js, a fast, unopinionated, and minimalist web framework for Node.js, comes into play.
Why Use Express?
Express simplifies the process of setting up a server and makes it easier to build robust APIs. It’s widely used, well-documented, and has a large community, making it a solid choice for our project.
Initializing Express
The first thing you’ll need to do is import Express into your project. If you haven’t installed it yet, you can do so using npm:
npm install expressOnce installed, you can import it into your project file:
import Express from 'express';Code Snippet for Express Setup
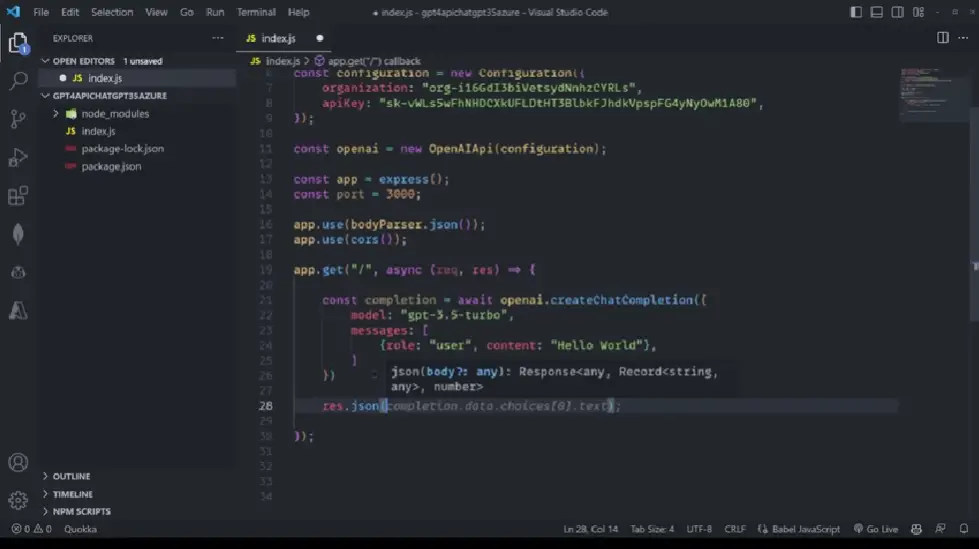
// Initialize Express
const app = Express();
// Set a port
const port = 3000;
// Use body-parser and cors middleware
app.use(bodyParser.json());
app.use(cors());
Setting Up Routes
With Express initialized, the next step is to set up routes that your API will implement. For this tutorial, we’ll set up a simple GET route:
// Setup a simple GET route
app.get('/', (req, res) => {
  res.send('Hello World!');
});
Listening on a Port
Finally, you’ll want your Express application to listen on a port. This is done using the listen method:
// Listen on port
app.listen(port, () => {
  console.log(`Server running on http://localhost:${port}/`);
});
And there you have it! You’ve set up a basic Express server that’s ready to handle API requests. In the next section, we’ll look at how to make your chat interactive by transitioning from a GET to a POST request.
Making the Chat Interactive
So, you’ve set up your OpenAI API, initialized your project, and even got your Express server running. But what’s a chat application without interactivity? In this section, we’ll transition from a GET to a POST request to make our chat truly interactive.
Why POST Over GET?
While GET requests are excellent for retrieving data, POST requests shine when you need to send data to the server. In the context of a chat application, POST requests allow us to send user messages to the server, which then processes them through the GPT API.
Listening for Messages in the POST Request
When setting up your POST request, it’s crucial to listen for incoming messages. These messages are then processed and sent to the GPT API for generating a response.
Code Snippet for POST Request Setup
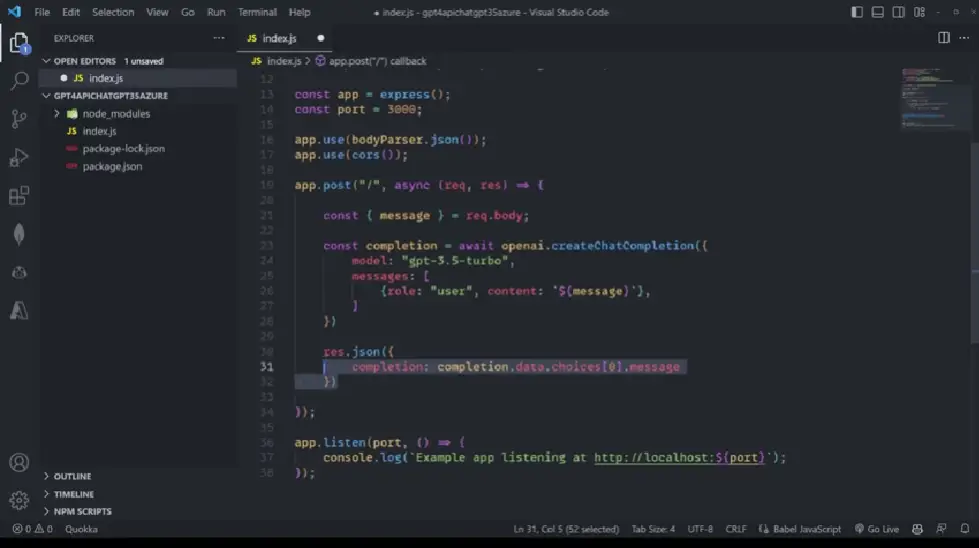
Here, you’ll see how to set up your POST request to listen for incoming messages. This code snippet shows you how to transition from a GET to a POST request.
Code Implementation
// Changing from GET to POST
app.post('/chat', async (req, res) => {
  const userMessage = req.body.message;
  // Your GPT API call and other logic here
  res.json({ 'GPT-Response': gptResponse });
});
Testing the POST Request
To test your POST request, you can use tools like Postman or even a simple cURL command. This step ensures that your server correctly receives the POST request and that the GPT API processes it as expected.
What’s Next?
Now that you’ve made your chat interactive, the next step is to create a frontend to interact with this server. Stay tuned for the next section where we’ll dive into creating a basic HTML frontend.
Creating the Frontend
Now that we have our backend up and running, it’s time to create a simple but effective frontend to interact with our ChatGPT API. This section will guide you through the steps to create a basic HTML frontend, complete with form and input fields.
HTML Form and Input Fields
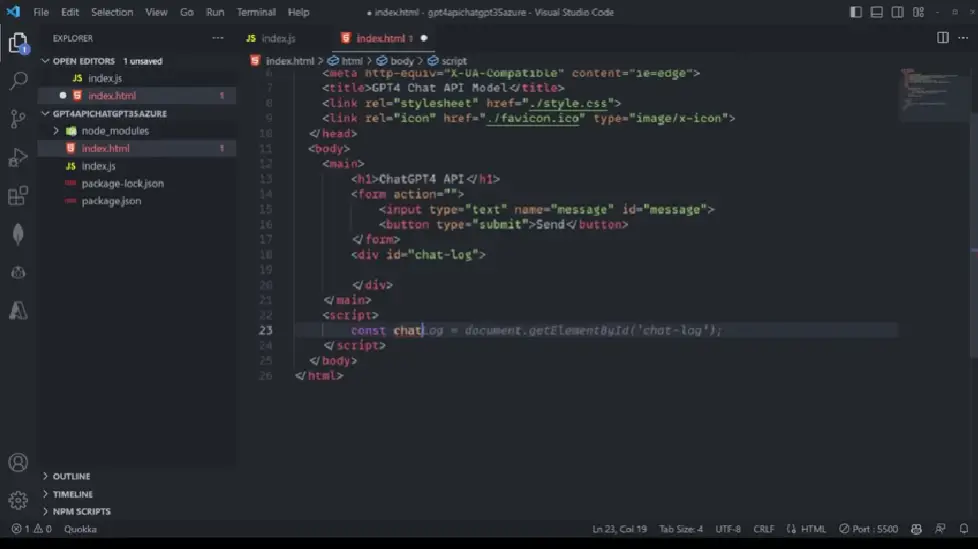
HTML Structure
Start by creating an HTML file and adding the basic structure. You can use a boilerplate HTML starter template to speed up the process. Rename the title to something like “ChatGPT API Frontend” and remove any unnecessary elements. <html> <head> <title>ChatGPT API Frontend</title> </head> <body> <h1>Chat with GPT-4</h1> </body> </html>
You can find a HTLM boilerplate at FreeCodeCamp.com.
Adding the Form
Next, you’ll want to add a form to your HTML file. This form will contain an input field for the user to type their message and a submit button to send the message to the backend. <form id=”chat-form”> <input type=”text” id=”message” name=”message” placeholder=”Type your message here”> <button type=”submit”>Send</button> </form>
Creating a Display Area
Finally, add a <div> element where the chat messages will be displayed. This will act as the chat log. <div id=”chat-log”></div>
And there you have it! You’ve successfully created a basic HTML frontend for your ChatGPT API. In the next section, we’ll dive into setting up the JavaScript to make this chat interactive.
Frontend JavaScript Setup
Now that you’ve got your HTML frontend ready, it’s time to breathe life into it with JavaScript. This section will guide you through setting up event listeners and message submission functionalities. By the end of this section, you’ll have a frontend that not only looks good but also interacts seamlessly with your backend.
Setting Up Event Listeners
Event listeners are the backbone of any interactive web application. They listen for user actions like clicks or keypresses and trigger corresponding functions. Let’s start by setting up an event listener for our chat form.
document.getElementById('chat-form').addEventListener('submit', function(event) {
  event.preventDefault();
  // Your code here
});
JavaScript Event Listener Setup
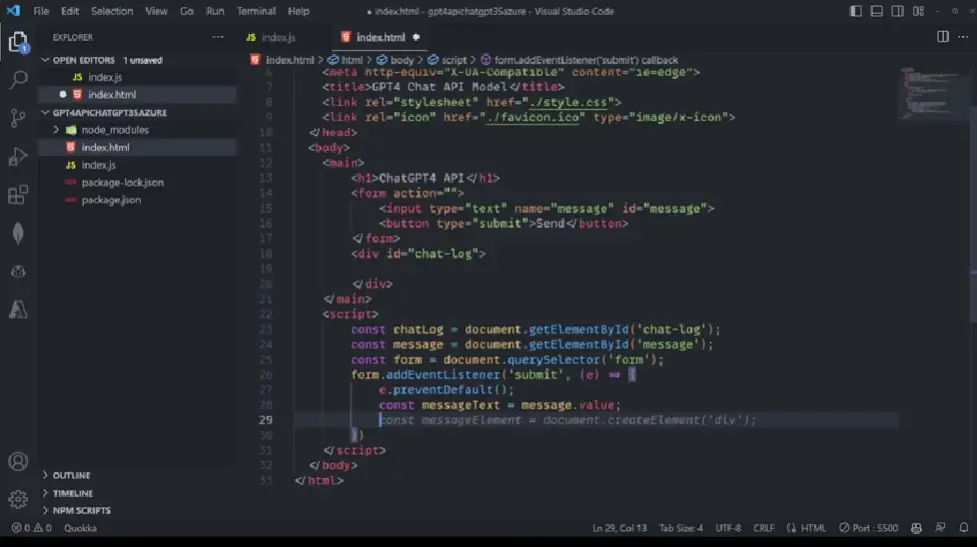
Message Submission
Once the event listener is set up, the next step is to grab the user’s message and send it to the backend. This is where the real interaction happens.
document.getElementById('chat-form').addEventListener('submit', function(event) {
  event.preventDefault();
  const userMessage = document.getElementById('message').value;
  // Send the message to the backend
});
JavaScript Message Submission Code
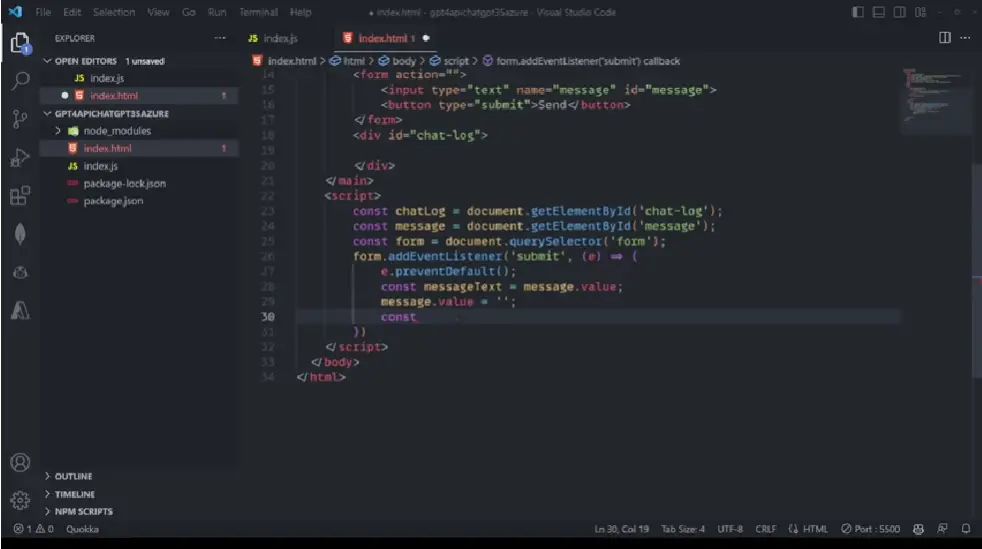
And there you have it! You’ve successfully set up the JavaScript for frontend interaction. With just a few lines of code, you’ve enabled your application to listen for user input and prepared it to send that input to the backend for further processing.
Up next, we’ll dive into how to make a POST fetch request to the OpenAI backend. Stay tuned!
Fetch Request to OpenAI Backend
Now that we’ve set up our frontend and backend, it’s time to connect the dots. In this section, we’ll explore how to make a POST fetch request to the OpenAI backend to interact with the ChatGPT API.
Why POST Fetch Requests are Crucial
POST fetch requests are the backbone of any interactive web application. They allow the frontend to send data to the backend, which can then be processed and returned. In the context of ChatGPT, this means sending user messages to the API and receiving generated responses.
Code Snippets for Fetch Request Setup
Below is a code snippet that demonstrates how to set up a POST fetch request to interact with the OpenAI backend.
fetch('http://localhost:3000/chat', {
  method: 'POST',
  headers: {
    'Content-Type': 'application/json',
  },
  body: JSON.stringify({ message: 'Hello, ChatGPT!' }),
})
.then(response => response.json())
.then(data => {
  console.log('Success:', data);
})
.catch((error) => {
  console.error('Error:', error);
});
Fetch Request Code Snippet
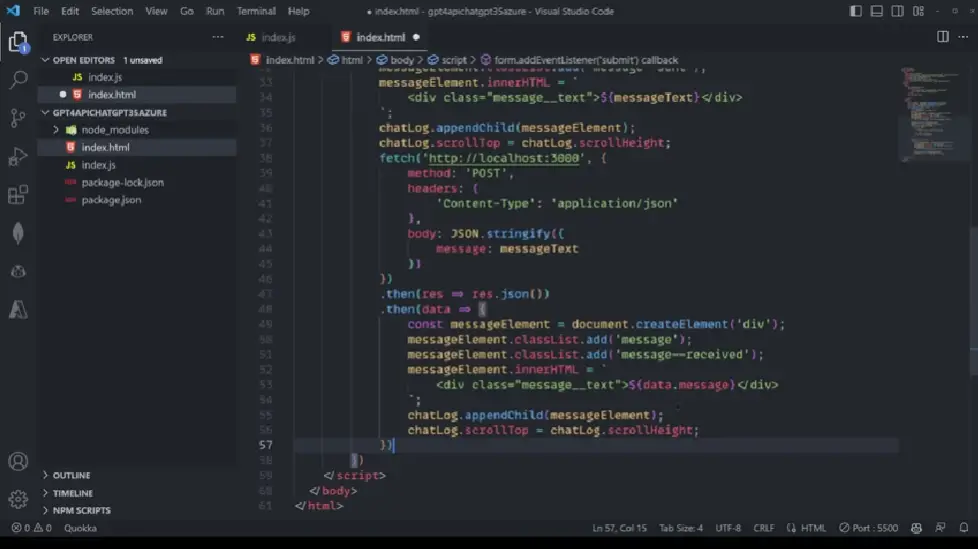
Understanding the Code
The code uses the Fetch API to make a POST request to our local server running on port 3000. The body contains the message we want to send to ChatGPT, which is then processed by the server and sent to the OpenAI API.
What Happens Next?
Once the fetch request is successful, the server processes the message, interacts with the ChatGPT API, and returns the generated message. This can then be displayed on the frontend, making for a seamless and interactive user experience.
Final Thoughts
Making a POST fetch request to the OpenAI backend is a straightforward yet crucial step in building an interactive chat application with ChatGPT. With just a few lines of code, you can unlock a world of conversational possibilities.
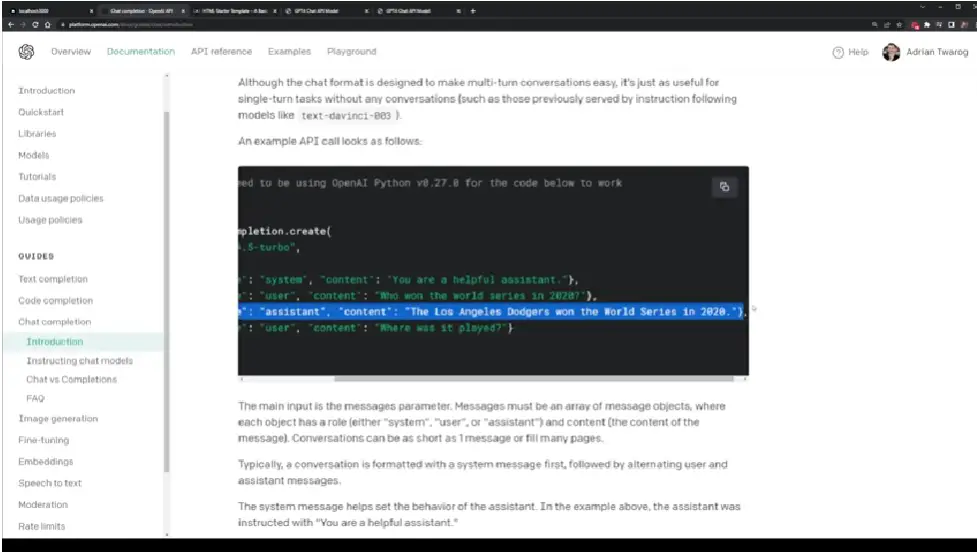
Adding Message History in GPT
As you delve deeper into the world of ChatGPT APIs, you’ll soon realize that maintaining a coherent and context-aware conversation requires more than just sending and receiving messages. Enter the concept of Message History.
Why Message History Matters
Message history is crucial for creating a seamless user experience. It allows the chat model to have a memory of the conversation, enabling it to provide more accurate and context-relevant responses. This is especially useful for multi-turn conversations where context from previous messages is essential for understanding the user’s current query.
Code Snippets for Setting Up Message History
Implementing message history in your ChatGPT API calls is surprisingly straightforward. You’ll need to modify your API payload to include an array of message objects, each having a ‘role’ and ‘content’.
// JavaScript code to include message history in API payload
const messages = [
  { role: 'system', content: 'You are a helpful assistant.' },
  { role: 'user', content: 'Who won the world series in 2020?' },
  { role: 'assistant', content: 'The Los Angeles Dodgers won the World Series in 2020.' },
  { role: 'user', content: 'Where was it played?' }
];
Message History Code Snippet
How to Implement It In Your Project
Once you’ve set up your message history array, include it in your API call to ChatGPT. The assistant will then have access to the entire conversation history, allowing it to generate more context-aware responses.
For more details on how to implement this, you can refer to the OpenAI API documentation.
Final Thoughts
Adding message history to your ChatGPT API calls is a game-changer. It elevates the conversational experience by making the assistant more aware and responsive to the context. Implementing it is easy, and the benefits are immediate. So why wait? Enhance your ChatGPT interactions with message history today!
Resources
Adrian Twarog’s YouTube Channel
For a visual guide on how to integrate GPT-4 and GPT-3.5 Turbo APIs, check out Adrian Twarog’s YouTube channel. The channel offers a plethora of tutorials on various tech topics, including OpenAI’s GPT models. Visit Adrian Twarog’s YouTube Channel
Teach Me OpenAI Digital Book
If you’re looking for a comprehensive guide to OpenAI and GPT, Adrian Twarog has put together a 60-page digital book. It covers everything from getting started to integrating OpenAI into your projects with code examples. Get the Teach Me OpenAI Digital Book
Helpful Services
Express.js – works with Node.js to make functionality accessible via a web server
Fetch API – The Fetch API provides an interface for fetching resources (including across the network).
FreeCodeCamp HTML Boilerplate – Simple boilerplate for HTML page
Postman – Use this to test your POST request
OpenAI Documentation
OpenAI’s official documentation is an invaluable resource for understanding how to work with their APIs. It provides detailed guides and API references. Visit OpenAI Documentation
NodeJS and VSCode Setup
Before you can start coding, you’ll need to set up your development environment. Here are the official websites for downloading NodeJS and Visual Studio Code.
Microsoft Azure
If you’re interested in deploying your application using serverless technology, Microsoft Azure is a reliable option. Learn how to deploy your application on Azure.Visit Microsoft Azure